
Shortly after we set up for the second banding session at Rollins Savanna last week, I was handed a CD full of photos from the first week. Janice Sweet took photos of the banding team all morning, and I requested permission to share some of them here on the blog. All of the following photos are from the May 31st session.
The first thing we do when processing a bird is to determine the species. For most birds this is not a problem. Although not all of the bird banders in our group are also birders, there are enough team members that can quickly and confidently identify the birds. When we catch an Empidonax flycatcher, ID can get a bit tricky.
After the bird is identified, a band is placed around the leg. The band sizes for each species are listed in the Pyle guide. For example, a band size of 2 or 3 is mentioned for the Blue Jay. Here the bands are being held up by the bird’s leg to determine the appropriate size for this individual.

Finding the right size band for a Blue Jay; photo by Janice Sweet
Next the band is carefully pulled apart using a special pair of pliers. The band is then transferred to the appropriately-sized hole in another special type of pliers to be placed onto the bird. Here are some photos of bands being applied.

Me banding an American Goldfinch; photo by Janice Sweet

Banding a Song Sparrow; photo by Janice Sweet

Me banding an American Robin; photo by Janice Sweet

Banding a Common Grackle; photo by Janice Sweet
Next we determine the sex and age of the bird. For sexually dichromatic species, like Northern Cardinals, Baltimore Orioles or American Goldfinches, determining sex is easy.

Me holding a male American Goldfinch; photo by Janice Sweet
For other species, we look for things like a brood patch or a cloacal protuberance to determine sex. To view these, we blow gently on the bird’s abdominal area to clear away feathers. You can see that the feathers of this Brown Thrasher are being blown up away from the body.
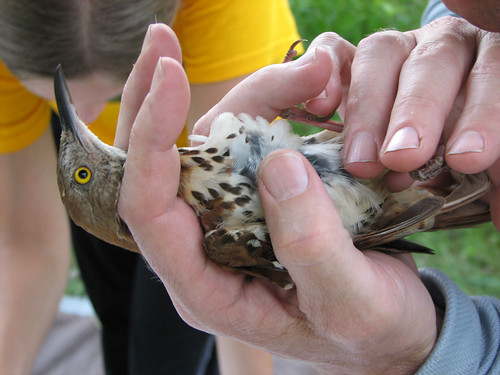
Checking a Brown Thrasher for brood patch; photo by blogger
Without getting too technical, age is often determined by looking very closely at certain feathers. We also look at the level of bone growth in the skull, viewed by clearing away head feathers with a bit of water. Eye color, other plumage clues and even bill color are also used to help determine age.

Skulling an American Robin; photo by blogger
Next, more measurements may be taken, including wing length, feather wear, feather molt, and fat level.

Measuring wing length of a Common Grackle; photo by Janice Sweet

Examining a Red-winged Blackbird’s wing; photo by Janice Sweet
Throughout the entire process, the safety of the bird is foremost in our minds. Part of this is keeping a firm but gentle grip on the bird during the procedure, and processing the bird quickly for a timely release.

Blue Jay; photo by Janice Sweet

Red-winged Blackbird; photo by Janice Swee

Field Sparrow; photo by Janice Sweet
My heartfelt thanks to Janice Sweet for allowing the use of her photos. Thanks, too, to the rest of the team. I am learning so much and having a lot of fun! Our second session was on June 11, and our third is planned for June 20. I will have more to share about these soon!


5 Responses to More MAPS bird banding highlights